Pagos con Stripe
Realizar pagos usando Stripe
Stripe Payment Gateway Integration in Laravel
Integración de Stripe Payment Gateway en Laravel
Laravel 10:
Laravel 10 Stripe Payment Integration And Dive Into Details
How to Integrate Stripe Payment Gateway in Laravel?
Conectarse por ssh y situarse en la carpeta del proyecto:
ssh usuario@alumno.me

cd todo
Configuración básica
Poner las API keys en el fichero .env
nano .env
STRIPE_PUBLISHABLE_KEY=pk_test_51L6A0cHXocgUjtsgQ7DbfmVqufx9pXK6to4ZtcWdqSegs7h7DtuU3lsF0aNTZWx0sHYdSqmdTJnodDI0UqBsH3w9000zRsXMja
STRIPE_SECRET_KEY=sk_test_51L6A0cHXocgUjtsg1EuvHhg0x2Rx6vOIEU6LbnZWPXkSt9so5dZY5mxAzupqj7Nbhn3khuAVIaR3zjvbDxKFfbAL00c9PfXqFC
STRIPE_CURRENCY=EUR
Limpiar la configuración de la caché
php artisan config:cache
Crear el fichero de migración de la tabla payments
php artisan make:migration create_payments_table
Abrir el fichero de migración y modificar la función up
nano database/migrations/2022_05_30_105253_create_payments_table.php
public function up()
{
    Schema::create('payments', function (Blueprint $table) {
        $table->bigIncrements('id');
        $table->string('payment_id');
        $table->string('payer_email');
        $table->float('amount', 10, 2);
        $table->string('currency');
        $table->string('payment_status');
        $table->timestamps();
    });
}
Ejecutar la migración
php artisan migrate
Añadir las rutas al fichero routes/web.php
No olvidar añadir el controlador
use App\Http\Controllers\PaymentController;


//rutas para el pago con Stripe
//Route::get('/payment', 'PaymentController@index');
Route::get('/payment', [PaymentController::class, 'index']);
Route::post('/charge', [PaymentController::class, 'charge']);
Route::get('/confirm', [PaymentController::class, 'confirm']);
Crear la vista payment.blade.php
nano resources/views/payment.blade.php
<link rel="stylesheet" href="{{ asset('/css/style.css') }}" />
<script src="https://js.stripe.com/v3/"></script>

@if ($message = Session::get('success'))
    <div class="success">
        <strong>{{ $message }}</strong>
    </div>
@endif


@if ($message = Session::get('error'))
    <div class="error">
        <strong>{{ $message }}</strong>
    </div>
@endif

<form action="{{ url('charge') }}" method="post" id="payment-form">
    <div class="form-row">
        <p><input type="text" name="amount" placeholder="Enter Amount" /></p>
        <p><input type="email" name="email" placeholder="Enter Email" /></p>
        <label for="card-element">
        Credit or debit card
        </label>
        <div id="card-element">
        <!-- A Stripe Element will be inserted here. -->
        </div>

        <!-- Used to display form errors. -->
        <div id="card-errors" role="alert"></div>
    </div>
    <p><button>Submit Payment</button></p>
    {{ csrf_field() }}
</form>
<script>
var publishable_key = '{{ env('STRIPE_PUBLISHABLE_KEY') }}';
</script>
<script src="{{ asset('/js/card.js') }}"></script>
Generar los elementos de la tarjeta
nano public/js/card.js
// Create a Stripe client.
var stripe = Stripe(publishable_key);

// Create an instance of Elements.
var elements = stripe.elements();

// Custom styling can be passed to options when creating an Element.
// (Note that this demo uses a wider set of styles than the guide below.)
var style = {
    base: {
        color: '#32325d',
        fontFamily: '"Helvetica Neue", Helvetica, sans-serif',
        fontSmoothing: 'antialiased',
        fontSize: '16px',
        '::placeholder': {
            color: '#aab7c4'
        }
    },
    invalid: {
        color: '#fa755a',
        iconColor: '#fa755a'
    }
};

// Create an instance of the card Element.
var card = elements.create('card', {style: style});

// Add an instance of the card Element into the `card-element` <div>.
card.mount('#card-element');

// Handle real-time validation errors from the card Element.
card.addEventListener('change', function(event) {
    var displayError = document.getElementById('card-errors');
    if (event.error) {
        displayError.textContent = event.error.message;
    } else {
        displayError.textContent = '';
    }
});

// Handle form submission.
var form = document.getElementById('payment-form');
form.addEventListener('submit', function(event) {
    event.preventDefault();

    stripe.createToken(card).then(function(result) {
        if (result.error) {
            // Inform the user if there was an error.
            var errorElement = document.getElementById('card-errors');
            errorElement.textContent = result.error.message;
        } else {
            // Send the token to your server.
            stripeTokenHandler(result.token);
        }
    });
});

// Submit the form with the token ID.
function stripeTokenHandler(token) {
    // Insert the token ID into the form so it gets submitted to the server
    var form = document.getElementById('payment-form');
    var hiddenInput = document.createElement('input');
    hiddenInput.setAttribute('type', 'hidden');
    hiddenInput.setAttribute('name', 'stripeToken');
    hiddenInput.setAttribute('value', token.id);
    form.appendChild(hiddenInput);

    // Submit the form
    form.submit();
}
hoja de estilos
nano public/css/style.css
.StripeElement {
    box-sizing: border-box;

    height: 40px;

    padding: 10px 12px;

    border: 1px solid transparent;
    border-radius: 4px;
    background-color: white;

    box-shadow: 0 1px 3px 0 #e6ebf1;
    -webkit-transition: box-shadow 150ms ease;
    transition: box-shadow 150ms ease;
}

.StripeElement--focus {
    box-shadow: 0 1px 3px 0 #cfd7df;
}

.StripeElement--invalid {
    border-color: #fa755a;
}

.StripeElement--webkit-autofill {
    background-color: #fefde5 !important;
}
Integración de la pasarela de pago con Stripe
instalar la biblioteca Omnipay en el proyecto
composer require league/omnipay omnipay/stripe
Crear el controlador PaymentController
php artisan make:controller PaymentController
Crear el modelo Payment, que está asociado con la tabla payments en la base de datos
php artisan make:model Payment
Definir las instrucciones en el controlador
nano app/Http/Controllers/PaymentController.php
<?php

namespace App\Http\Controllers;

use Illuminate\Http\Request;
use Omnipay\Omnipay;
use App\Models\Payment;

class PaymentController extends Controller
{
    public $gateway;
    public $completePaymentUrl;

    public function __construct()
    {
        $this->gateway = Omnipay::create('Stripe\PaymentIntents');
        $this->gateway->setApiKey(env('STRIPE_SECRET_KEY'));
        $this->completePaymentUrl = url('confirm');
    }

    public function index()
    {
        return view('payment');
    }

    public function charge(Request $request)
    {
        if($request->input('stripeToken'))
        {
            $token = $request->input('stripeToken');

            $response = $this->gateway->authorize([
                'amount' => $request->input('amount'),
                'currency' => env('STRIPE_CURRENCY'),
                'description' => 'This is a X purchase transaction.',
                'token' => $token,
                'returnUrl' => $this->completePaymentUrl,
                'confirm' => true,
            ])->send();

            if($response->isSuccessful())
            {
                $response = $this->gateway->capture([
                    'amount' => $request->input('amount'),
                    'currency' => env('STRIPE_CURRENCY'),
                    'paymentIntentReference' => $response->getPaymentIntentReference(),
                ])->send();

                $arr_payment_data = $response->getData();

                $this->store_payment([
                    'payment_id' => $arr_payment_data['id'],
                    'payer_email' => $request->input('email'),
                    'amount' => $arr_payment_data['amount']/100,
                    'currency' => env('STRIPE_CURRENCY'),
                    'payment_status' => $arr_payment_data['status'],
                ]);

                return redirect("payment")->with("success", "Payment is successful. Your payment id is: ". $arr_payment_data['id']);
            }
            elseif($response->isRedirect())
            {
                session(['payer_email' => $request->input('email')]);
                $response->redirect();
            }
            else
            {
                return redirect("payment")->with("error", $response->getMessage());
            }
        }
    }

    public function confirm(Request $request)
    {
        $response = $this->gateway->confirm([
            'paymentIntentReference' => $request->input('payment_intent'),
            'returnUrl' => $this->completePaymentUrl,
        ])->send();

        if($response->isSuccessful())
        {
            $response = $this->gateway->capture([
                'amount' => $request->input('amount'),
                'currency' => env('STRIPE_CURRENCY'),
                'paymentIntentReference' => $request->input('payment_intent'),
            ])->send();

            $arr_payment_data = $response->getData();

            $this->store_payment([
                'payment_id' => $arr_payment_data['id'],
                'payer_email' => session('payer_email'),
                'amount' => $arr_payment_data['amount']/100,
                'currency' => env('STRIPE_CURRENCY'),
                'payment_status' => $arr_payment_data['status'],
            ]);

            return redirect("payment")->with("success", "Payment is successful. Your payment id is: ". $arr_payment_data['id']);
        }
        else
        {
            return redirect("payment")->with("error", $response->getMessage());
        }
    }

    public function store_payment($arr_data = [])
    {
        $isPaymentExist = Payment::where('payment_id', $arr_data['payment_id'])->first();

        if(!$isPaymentExist)
        {
            $payment = new Payment;
            $payment->payment_id = $arr_data['payment_id'];
            $payment->payer_email = $arr_data['payer_email'];
            $payment->amount = $arr_data['amount'];
            $payment->currency = env('STRIPE_CURRENCY');
            $payment->payment_status = $arr_data['payment_status'];
            $payment->save();
        }
    }
}
Test
How to use test cards
Any time you work with a test card, use test API keys in all API calls. This is true whether you’re serving a payment form to test interactively or writing test code.
Testing interactively
When testing interactively, use a card number, such as 4242 4242 4242 4242. Enter the card number in the Dashboard or in any payment form.
- Use a valid future date, such as 12/34.
- Use any three-digit CVC (four digits for American Express cards).
- Use any value you like for other form fields.
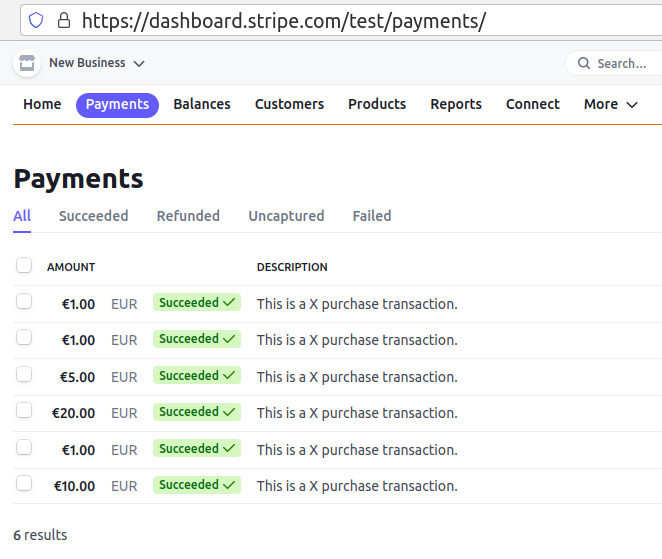
Comprobar los pagos
Acceder al dashboard de Stripe
Deja una respuesta
Lo siento, debes estar conectado para publicar un comentario.